Fundraising events teams often take printed paper check-in lists to events to record attendance, answer table seating questions, confirm dietary restrictions, and more. In other cases, the check-in list is uploaded to a third-party check-in app that is used via an iPad or mobile phone to record attendance, which then needs to be moved back into Atlas. This Atlas Check-in feature enables users to quickly check attendees in, answer questions, and update records directly in Atlas. Note that use of this functionality at an event will require Wi-Fi connection to the MGB VPN.
This feature can be accessed via the Events menu, the Events calendar, and a Task in the More information area when looking at a specific event.

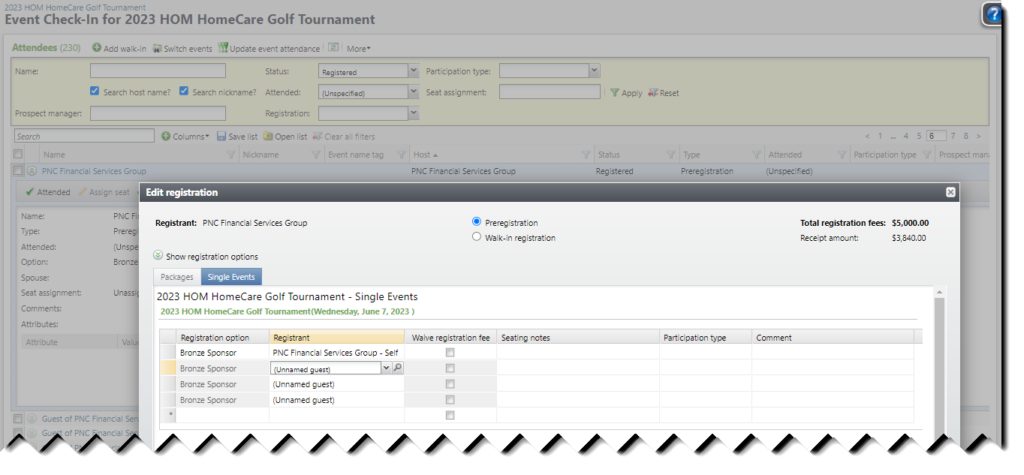
Event Check-In is a list builder with the typical list builder features (including the ability to add and remove columns and change column order). Note that when this window is first opened, the left menu is hidden by default (since users will typically not need any additional features during check-in).

The available columns are
- Attended. Included in the default layout. This value changes as attendees are marked attended. Values are Yes, No, No-show, (Unspecified).
- Event. The name of the Event.
- Event name tag. Included in the default layout.
- First name
- Host. Included in the default layout.
- Last name
- Name. Included in the default layout.
- Nickname. Included in the default layout.
- Participation type. Included in the default layout.
- Prospect manager. Included in the default layout. Shows Prospect manager or Associated prospect manager for constituents under management.
- Registration. Included in the default layout.
- Seat assignment. Included in the default layout. Shows Section number/Table number or name/Seat number.
- Status. Included in the default layout.
- Type. Included in the default layout.
The available filters are
- Name
- Status. Values are Registered, Will not attend, Declined, Canceled, No reply. During check-in at an event, use this filter to display only registered constituents, making the list more manageable.
- Participation type
- Search host name? When this box is checked, the Name search will also consider Host names to quickly find “guest of” records without a specific guest name.
- Search nickname? When this box is checked, the Name search will also consider Nicknames.
- Attended
- Seat assignment. This is not a list of tables, but a text search where users can type a phrase (e.g., “head table”).
- Prospect manager. This is a text search where users can type a complete or partial prospect manager name. This is helpful when a Prospect manager has greeted their assigned prospect(s) at an event and is checking in on their behalf.
- Registration
The secondary view for each record contains the column information, as well as balance (if there is one) and separate grids for Registrant attributes, Preferences, and Event restrictions, enabling event staff to quickly verify these details. (Note that Constituent default event restrictions are not listed, as they are copied to the Registrant record and will typically match the Event restrictions.)
For more information on these fields and what they mean, see the Atlas Events Glossary.
For each row, the tasks available depend on the event details and on the registrant record. In general, you will find an option to mark the registrant Attended (which will read “Not attended” for those already marked attended), No-show/Will not attend, Canceled and Delete. You can also mark multiple records Attended at once by selecting multiple records and then clicking on Attended.
There is also an option to Edit the record. On a host record, use Edit to launch the Edit registrations form; from here, change the “guest” record to a proper constituent record with the drop-down list or Constituent search, or change the constituent to another constituent if a different person is attending the event.

Additionally, registrants can be added from the Add Walk-in button. When the add a registrant window opens, search for any constituent in the database and indicate the correct registration option. Clicking save will add the walk-in as a registrant and mark them attended.
Note: If the constituent selected from the Add Walk-in button has been invited to the event, but not yet registered, they will be registered when you click save, but not marked attended. In this case, once they have been registered, search for them in the listbuilder and mark them attended.
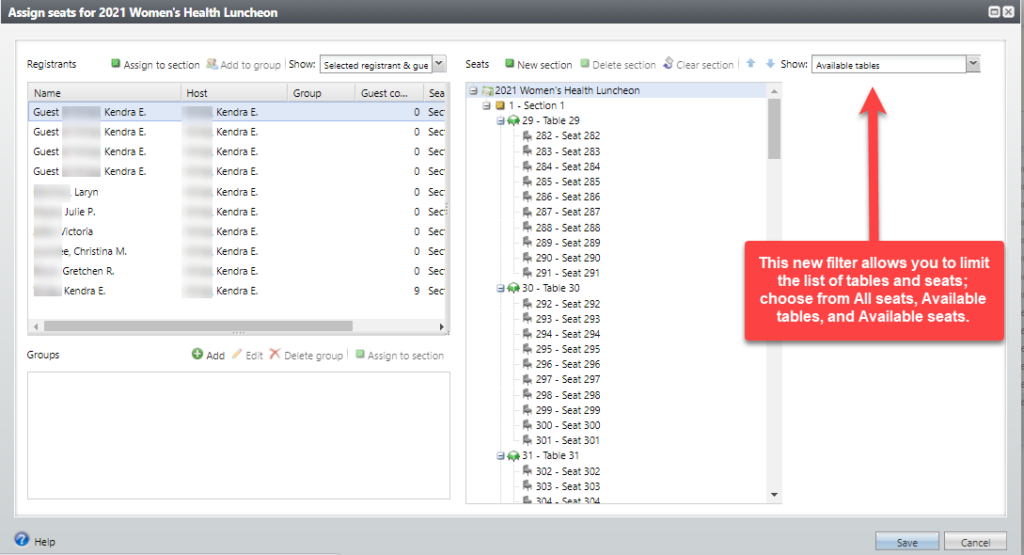
Finally, for seated events, an Assign seat option is available, and the Assign seats form has been modified to make it easier to find empty seats and tables and to seat guests together with their hosts. When this form is launched from the Event Quick-in, the Name of the selected Registrant defaults into the list of Registrants, along with all members of their part. This will make it easier to seat them all at once.

At the conclusion of an event, use the Update event attendance task to update all “unspecified” records (those you did not mark attended) to No show or Attended. The Attended field on all these records will also be updated to No.
Good to Know!
- The Event Check-in interface is an Atlas Listbuilder List. This means you can set filters and display preferences and save them for use later. For more information about the capabilities of a Listbuilder, please see Getting the most out of List Builder Lists.docx.
